This is a part 2 of the journey started in part 1.
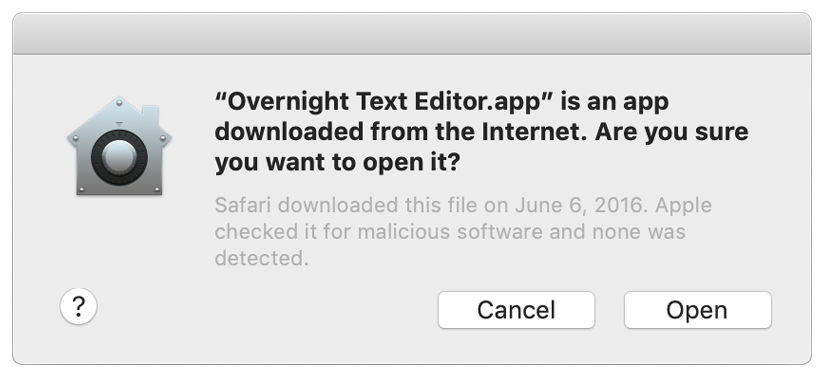
When you download an app from the internet on macOS, it adds an attribute com.apple.quarantine (you can see that using command xattr /path/to/MyApp.app). When you open such app, you will see a Gatekeeper greeting:
Apple announced that all new software for macOS Catalina will need to be notarized. And that you won’t be able to open unnotarized software even bypassing Gatekeeper selecting “Open” from context menu. Now every developer should pay $99 per year to get Apple Developer certificate and therefore - making there apps paid too. But this is a topic for a different discussion.
So what is notarization?
Notarization is a “virus scan” of your app done by Apple. After the scan Apple creates a “report” (also called ticket) that your app is safe (that’s only when you passed notarization). After that you can distribute your app with the report and Gatekeeper will let you through.
How to notarize an app?
First of all, I recommend to read a bunch of official Apple documentation. You will need to codesign your app bundle with enabled hardened runtime, with correct entitelments file and then upload it to Apple and wait for the notarization to finish.
Secondly, after you finished docs reading, here’s the procedure I use (I will assume you already signed up for Developer program itself).
1. Registration (usually done once)
Go to Apple Developer Portal and create a new Bundle ID for your application. This should look like a reverse url (e.g. “com.mydomain.MyApp”).
2. Preparation (usually done once)
- Create a certificate signing request: for Developer ID Application using
Keychain Access -> Certificate Assistant -> Request a certificate from certificate authority - In the “Common Name” enter “Name Surname Dev Cert” etc. and in the email - apple id
- Go to Apple Developer Portal and create a certificate using appropriate signing request
- Install certificates locally (double-click
.cerfile) but verify that it is installed inKeychain Access -> Certificates - On the Apple ID website create a new app-specific password for the notarization submission tool and set this password using command
xcrun notarytool store-credentials PROFILE --apple-id APPLE_ID --team-id TEAMwherePROFILEis the name of the Keychain entry.
3. Signing
As for the Build part of your C++ app, you need to build for release and x86_64 architecture. Also you need to include correct debug symbols: add CFLAGS += -gdwarf-2 and CXXFLAGS += -gdwarf-2 to your favorite build/project tool.
Then after the app is built, you need to create a .app bundle, including all dependent libraries and frameworks. You can read more about it in the previous part.
After you have the bundle, you need to codesign all libraries, plugins and frameworks.
In the script below ${DEVELOPER_ID} is your Apple Developer ID e.g. “Developer ID Application: Name Surname (QWERTY123)”.
CODESIGN_OPTIONS="-f --timestamp --verbose=4 --options=runtime -i ${BUNDLE_ID} --entitlements ${ENTITLEMENTS_PATH}"
echo "Signing the frameworks..."
for FRAMEWORK in $(ls "${APP_BUNDLE}"/Contents/Frameworks | grep framework | sed 's/\.framework//')
do
    echo "About to sign $FRAMEWORK"
    codesign ${CODESIGN_OPTIONS} --sign "${DEVELOPER_ID}" "${APP_BUNDLE}"/Contents/Frameworks/$FRAMEWORK.framework
done

echo "Signing the dylibs..."
find "${APP_BUNDLE}"/Contents/Frameworks -name "*.dylib" -exec codesign ${CODESIGN_OPTIONS} --sign "${DEVELOPER_ID}" '{}' \;

echo "Signing the plugins..."
find "${APP_BUNDLE}"/Contents/PlugIns -name "*.dylib" -exec codesign ${CODESIGN_OPTIONS} --sign "${DEVELOPER_ID}" '{}' \;
Only after this is done you can codesign main executable.
codesign ${CODESIGN_OPTIONS} --sign "${DEVELOPER_ID}" "${APP_BUNDLE}"
Also I recommend to verify that your bundle is correctly signed:
codesign --verbose --verify "${APP_BUNDLE}"
4. Notarize the bundle
This section is updated for the notarytool migration Apple did by 1 Nov 2023. If you’re migrating from the old tool, check the official guide
Now you need to notarize the bundle. Apple provides you with notarytool that is capable of sending a notarization request, but it cannot send a directory (remember that .app is just a suffix, in reality your bundle is a simple directory). So first you need to create a zip archive.
Also notarytool will access your app-specific password in the keychain using a special syntax.
NOTARIZE_APP_PATH="${APP_NAME}.app"
NOTARIZE_ZIP_PATH="${APP_NAME}.zip"

/usr/bin/ditto -c -k --keepParent "$NOTARIZE_APP_PATH" "$NOTARIZE_ZIP_PATH"

echo "Sending notarization request to Apple..."
xcrun notarytool submit \
                 --apple-id "${APPLE_ID}" \
                 --team-id "${TEAM_ID}" \
                 --keychain-profile "AC_PASSWORD" \
                 --wait \
                 "${NOTARIZE_ZIP_PATH}"
Note that due to --wait argument, the previous command will wait on it’s own for the notarization to finish, whereas before you needed to poll for it yourself. AC_PASSWORD is the “profile” name that you used in the “Preparation” phase (app-specific password).
After you verified that Apple notarized your app, you need to staple the notarization ticket to your app.
xcrun stapler staple "${APP_BUNDLE}"
From now on As long as you pay Apple for the Developer Certificate, this particular Bundle should pass Gatekeeper. You can actually verify that:
spctl --assess --verbose --type execute --ignore-cache --no-cache "${APP_BUNDLE}"

xcrun stapler validate "${APP_BUNDLE}"
And even besides of that you should send your app to yourself in the email and check that it passes Gatekeeper.
5. Rinse and repeat for .dmg
Previous steps are good if you’re distributing your app in a zip archive. But the odds are you’re using .pkg or .dmg. If you put your app into a .dmg, it will again become unsafe! So you need to repeat the previous exercise with the .dmg: sign it and notarize.
If you don’t know how to create a .dmg, check out part 1.
To sign the dmg use:
CODESIGN_OPTIONS="-f --verbose=4 --options=runtime"

codesign ${CODESIGN_OPTIONS} --sign "${DEVELOPER_ID}" "${DMG_PATH}"
However, you don’t need to archive it since .dmg is a single file, not a directory. So you can notarize it as is:
xcrun notarytool submit \
                 --apple-id "${APPLE_ID}" \
                 --team-id "${TEAM_ID}" \
                 --keychain-profile "AC_PASSWORD" \
                 --wait \
                 "$DMG_PATH"
After it’s done you need to staple the notarization ticket too:
xcrun stapler staple "${DMG_PATH}"
Don’t forget to verify everything:
spctl -a -t open --context context:primary-signature -v "${DMG_PATH}"

xcrun stapler validate "${DMG_PATH}"
Pitfalls
It is possible that even after spctl and xcrun will report that your app is signed and notarized it still will be rejected by Gatekeeper. It can happen if an app uses an absolute @rpath or absolute path to link to a dynamic library.
In order to see which path it is, run otool -L /path/to/binary and otool -l /path/to/binary. If you find any non-system library with absolute path, check for more details about how to fix this in part 1 (you need to use install_name_tool).
The end
Notarization process is definitely a pain the ass to already non-trivial deployment procedures and there’s no workaround. The only way is to master it and create some automation around.
Please let me know if you were able to repeat this guide and create your notarized apps.