That’s awesome how many Full-Stack Developers are out there nowadays: full Node.js stack or ASP.NET or what not is popular. However, this is a story of a completely different “stack”.
I truly believe that software-only engineers somewhere deep inside are always dreaming of pilgrimage to the sacred temples of Hardware and Electronics. All those wires, volts, chips and firmware are just too interesting to avoid them when you only deal with computers above the Transport layer. Basically that’s how I was seduced to the dark side, on my own.
I has already been looking for a possibility to do something “forbidden” for quite some time. Words like soldering, Arduino, IO pins, “10K resistor before LED” were constantly spinning in my head but I didn’t have just any time for it. Luckily, this month my brother was going to visit me for a week so I decided it would be a perfect time to do some hacking together.
Apparently it was hard to come up with an idea of what exactly to do. Of course, I wanted to do something “special” right ahead but I had to admit I didn’t have any basic knowledge about that stuff. After some research I decided to start with something simple: to create first iteration of “smart home”. Particularly I wanted to know what temperature is in every room of the apartment I live in. And plan to implement that was the following:
- Arduino will read temperature with sensor DHT22 and send data with 433MHz module
- Raspberry Pi will receive data with 433MHz module and save it to DB
- Raspberry Pi will serve simple website where you can see the data
- once that will work, create “real” sensor based on Arduino Mini
Hardware/Firmware
First part to implement was transmitter-receiver with Arduino-RaspberryPi respectively. After reading manuals to 433MHz module I brought in the local shop, this simple prototype has been assembled with Raspberry Pi:
 Yes, you have to solder antenna on your own
In order to check if radio channel is working at all we chose 433-Utils. They provide an app which just prints everything it receives via 433MHz receiver to stdout. Please keep in mind that you only need to connect input pin to Raspberry Pi’s Pin 21 on model B (27 on newer models) since 433MHz receiver only generates interrupts, not GPIO inputs.
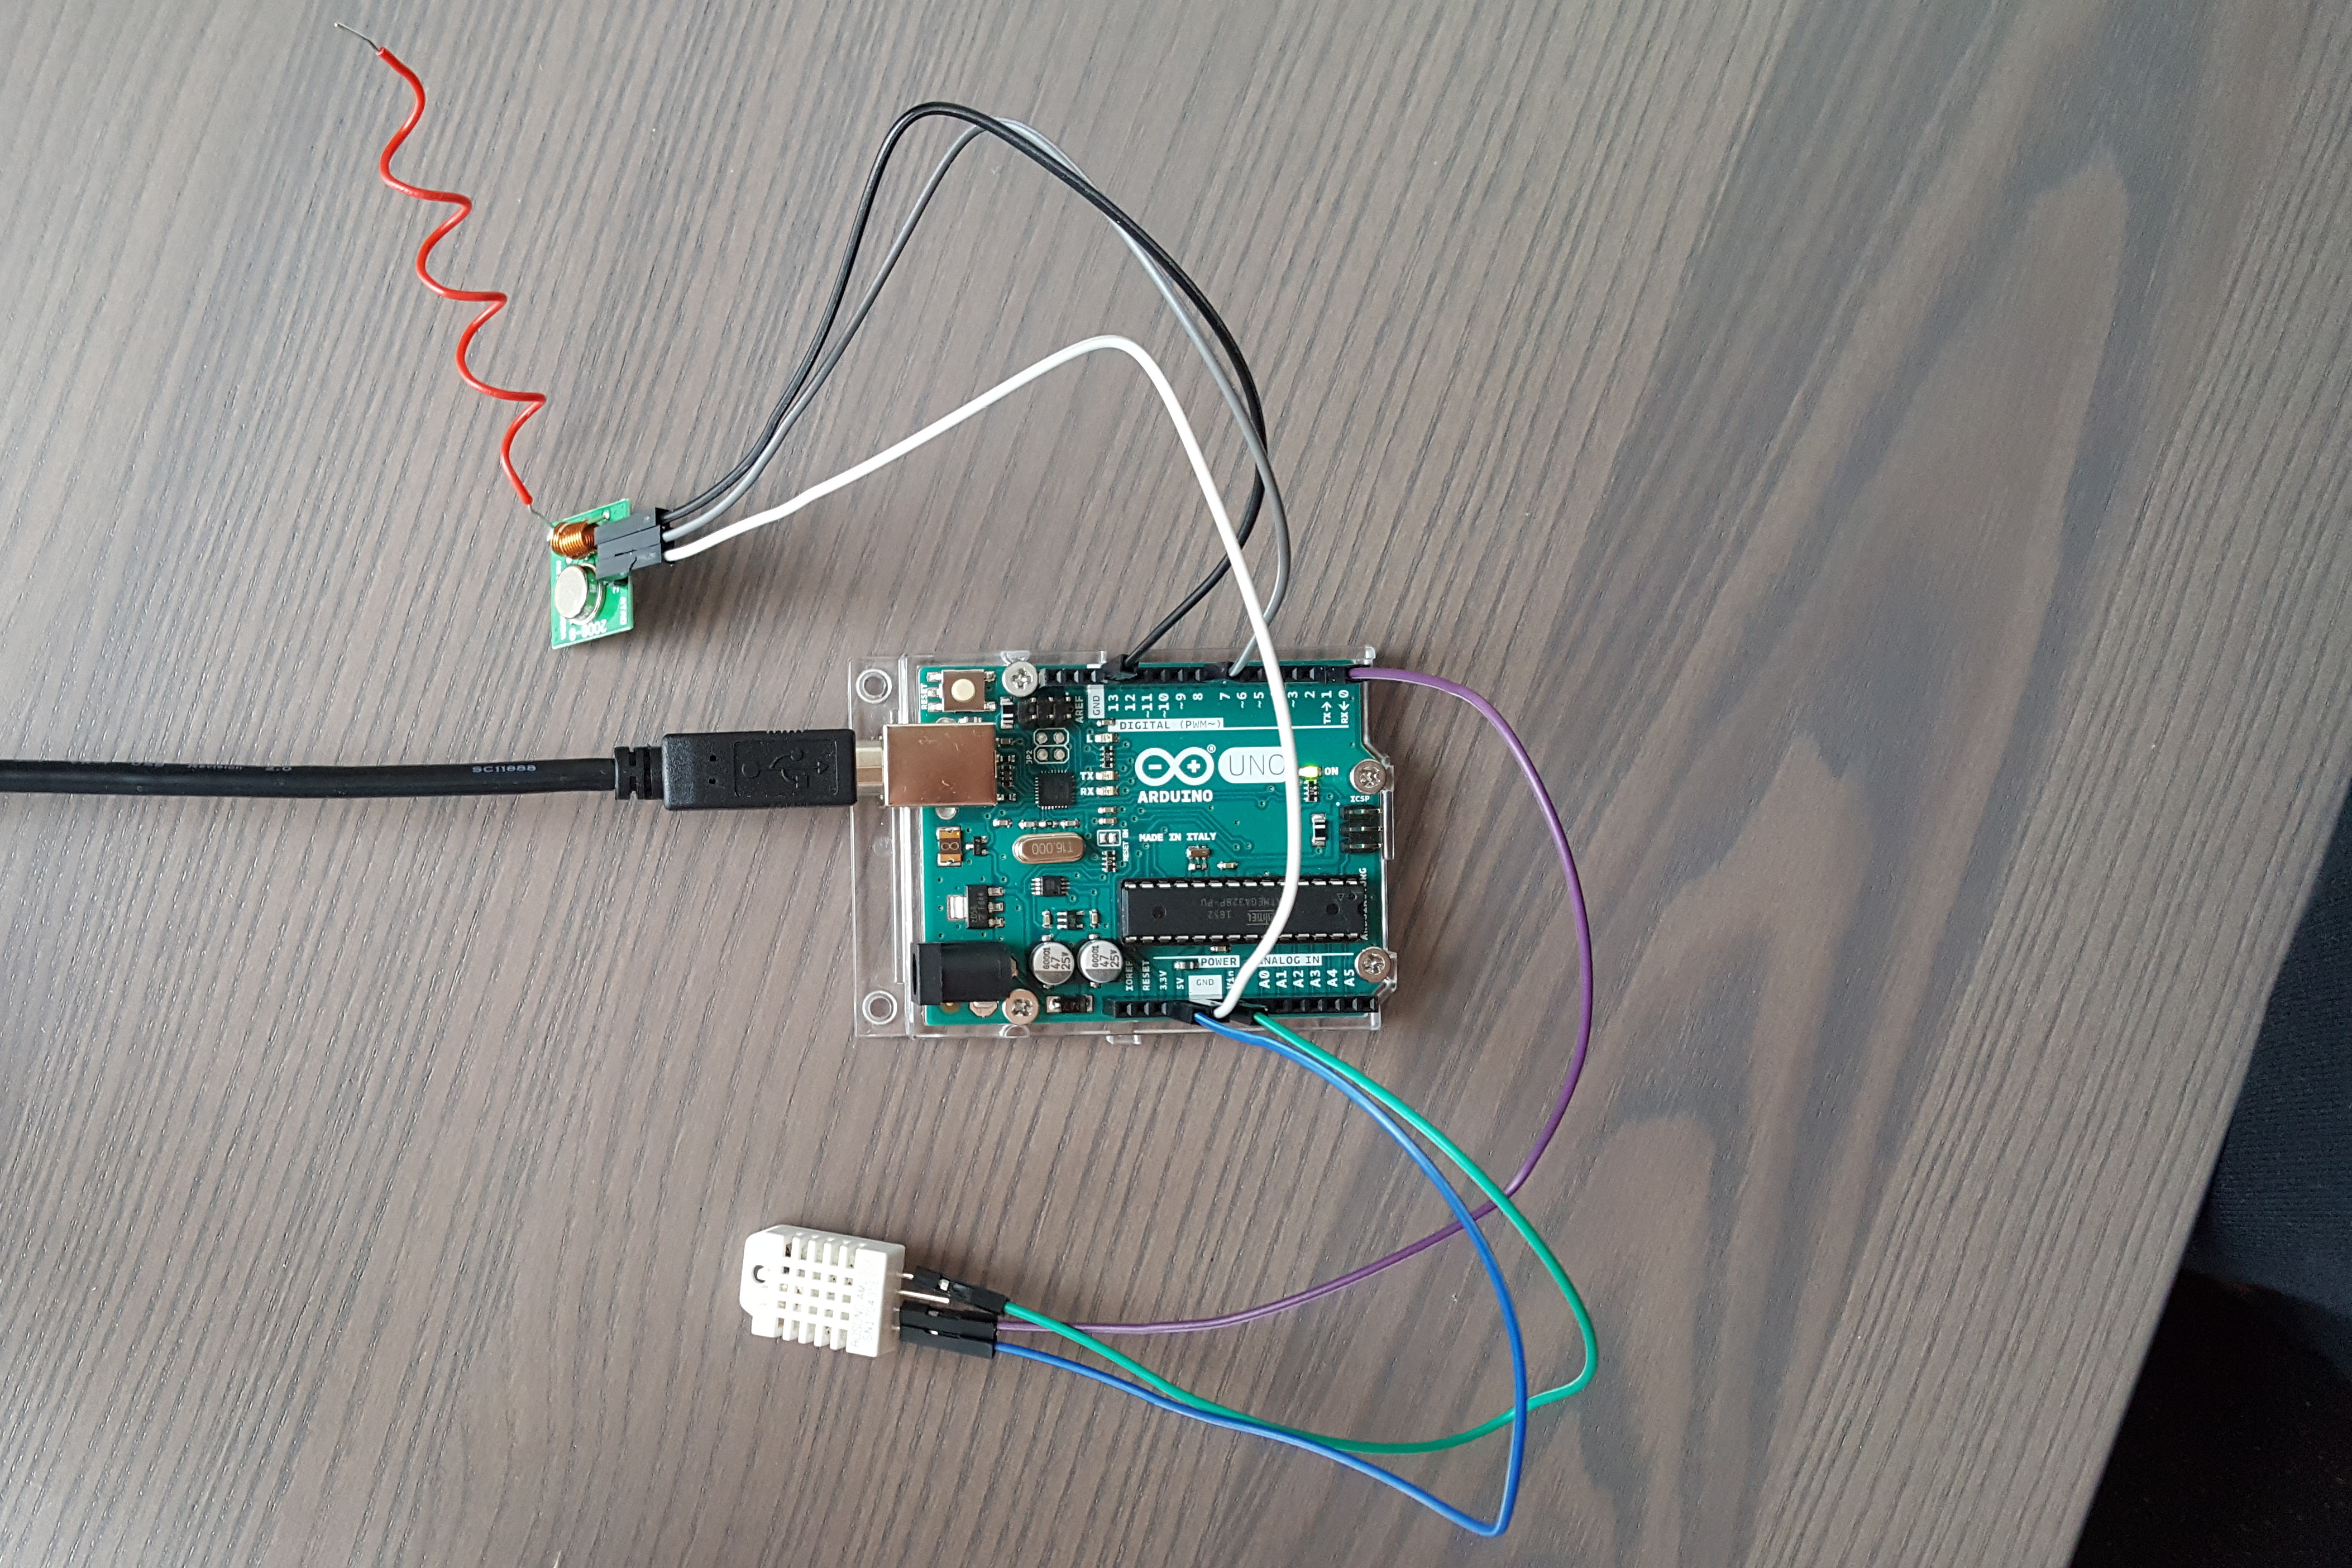
As for the Arduino - connecting transmitter was a lot easier and there’re many examples with RC-switch library to do that.
// just send "42" each 5 seconds
// and blink with LED when we send
#include "RCSwitch.h"

#define RADIO_PIN 8
#define LED_PIN 13

RCSwitch tempSwitch = RCSwitch();

void setup() {
   tempSwitch.enableTransmit(RADIO_PIN);
   pinMode(LED_PIN, OUTPUT);
}

void loop() {
  int message = 42;
  tempSwitch.send(message, 32);

  digitalWrite(LED_PIN, HIGH);
  delay(500);
  digitalWrite(LED_PIN, LOW);

  delay(5000);
}
 Yes, and you have to solder another antenna to transmitter as well
Protocol
After verifying that messaging over 433MHz works, now it’s time to send useful information. To get temperature reading we will use sensor DHT22, which is very easy to add to the Arduino. You have also to include DHT library of version 1.2.3 since 1.3.0 is broken for some reason. Now the time has come to come up with some sort of protocol to transmit temperatures to Raspberry Pi. We needed to know ID of the sensor and temperature it reports. We operate on 32-bit integers for sending so I came up with the following simple protocol:
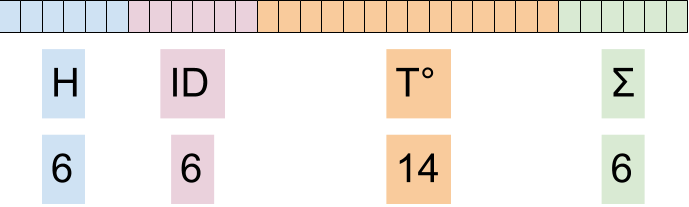
So we will be sending 6-bit header, specifying that it’s our protocol, 6-bit sensor ID (having maximum 64 sensors in our apartment) 14-bit temperature and 6-bit checksum to verify everything arrived correctly. To encode temperature we can use only integer values. We know that sensor operates from -40 to 80 degrees so we can do fixed-point encoding where data that we send will be just number of steps from TEMP_MIN + TEMP_STEP * value. Using such encoding we could send temperature readings with quite decent resolution of 0.0073852539 degree.
Last step to polish the firmware was to add a delay of 10 minutes instead of 5 seconds, because temperature in the apartment does not change that often and we need to save power for Arduino if it will be autonomous.
Temperature Server
Next thing to work on was our own server on Raspberry Pi which will save those temperatures. Just 433-Utils app which prints raw data to stdout was no longer enough. Of course, we needed a database for that as well. I chose SQLite: for an application on C++ which was receiving data from sensor and needed to save it somewhere this was the easiest option in my opinion. Of course it does not have delta encoding and it’s probably bad for saving time series but for the load arriving from 64 sensors at maximum it is probably more than OK.
main() was only about reading data from RCswitch library and trying to parse integers out of it:
const int IO_PIN = 2;
tempSwitch = RCSwitch();
tempSwitch.enableReceive(IO_PIN);
log("Listening on pin %d...", IO_PIN);

sqlite3 *db = 0;
initializeDatabase(db);
if (!createTemperatureTable(db)) {
    log("Failed to create table in DB");
    return DB_ERROR;
}

sqlite3_stmt *insertStatement = 0;
insertStatement = prepareInsertTempStmt(db);
if (insertStatement == 0) {
    log("Failed to create INSERT statement");
    return DB_ERROR;
}

while (1) {
    if (tempSwitch.available()) {
        int value = tempSwitch.getReceivedValue();
        tempSwitch.resetAvailable();

        handleReading(db, insertStatement, (unsigned int)value);
    }
}
where handleReading() is parsing the message and saving temperature to the database.
Web server
The other piece of software to write was a web server to show the temperature through local website. I had many options for language for such a task - Ruby, Python, Go would easily fit. The point was to do as little work as possible so we choose Go.
The webserver was supposed to do 2 main functions: to produce json replies for REST API (GET request) and to serve static webpage with some javascript which fetches the readings and renders them.
The former requirement was implemented using custom type with prepared SQLite statement which implemented http.Handler interface. The latter requirement - just with default http.FileServer call. Main function looked like this:
handler := &TempHandler{}
err = handler.initDatabase()
if err != nil { return }

http.Handle("/", http.FileServer(http.Dir("./www")))
http.Handle("/temps", handler)

err = http.ListenAndServe(":8080", nil)
Front End
Directory www contained 2 files: index.html and homeinsights.js. Html page only had a bare skeleton with one div element with an ID for charts. We chose D3.js for plotting and javascript file only requested json with reading from Go webserver and rendered them on a chart.
window.onload = function () {
    var url = document.URL + 'temps?lastn=150';

    d3.json(url, function(data) {
        if (data) {
            var groupData = data.groupBy('sensorID');

            var line = d3.line()
                .x(function(d) { return xScale(mapDate(d)); })
                .y(function(d) { return yScale(mapTemp(d)); });

            d3.select('#linechart')
                 .append('svg').append('g')
                 .selectAll('g.charts')
                 .data(groupData).enter()
                 .append('g').append('path')
                 .attr("stroke-width", 2)
                 .attr('d', function(d) { return line(d);});
            }
        }
    });
};
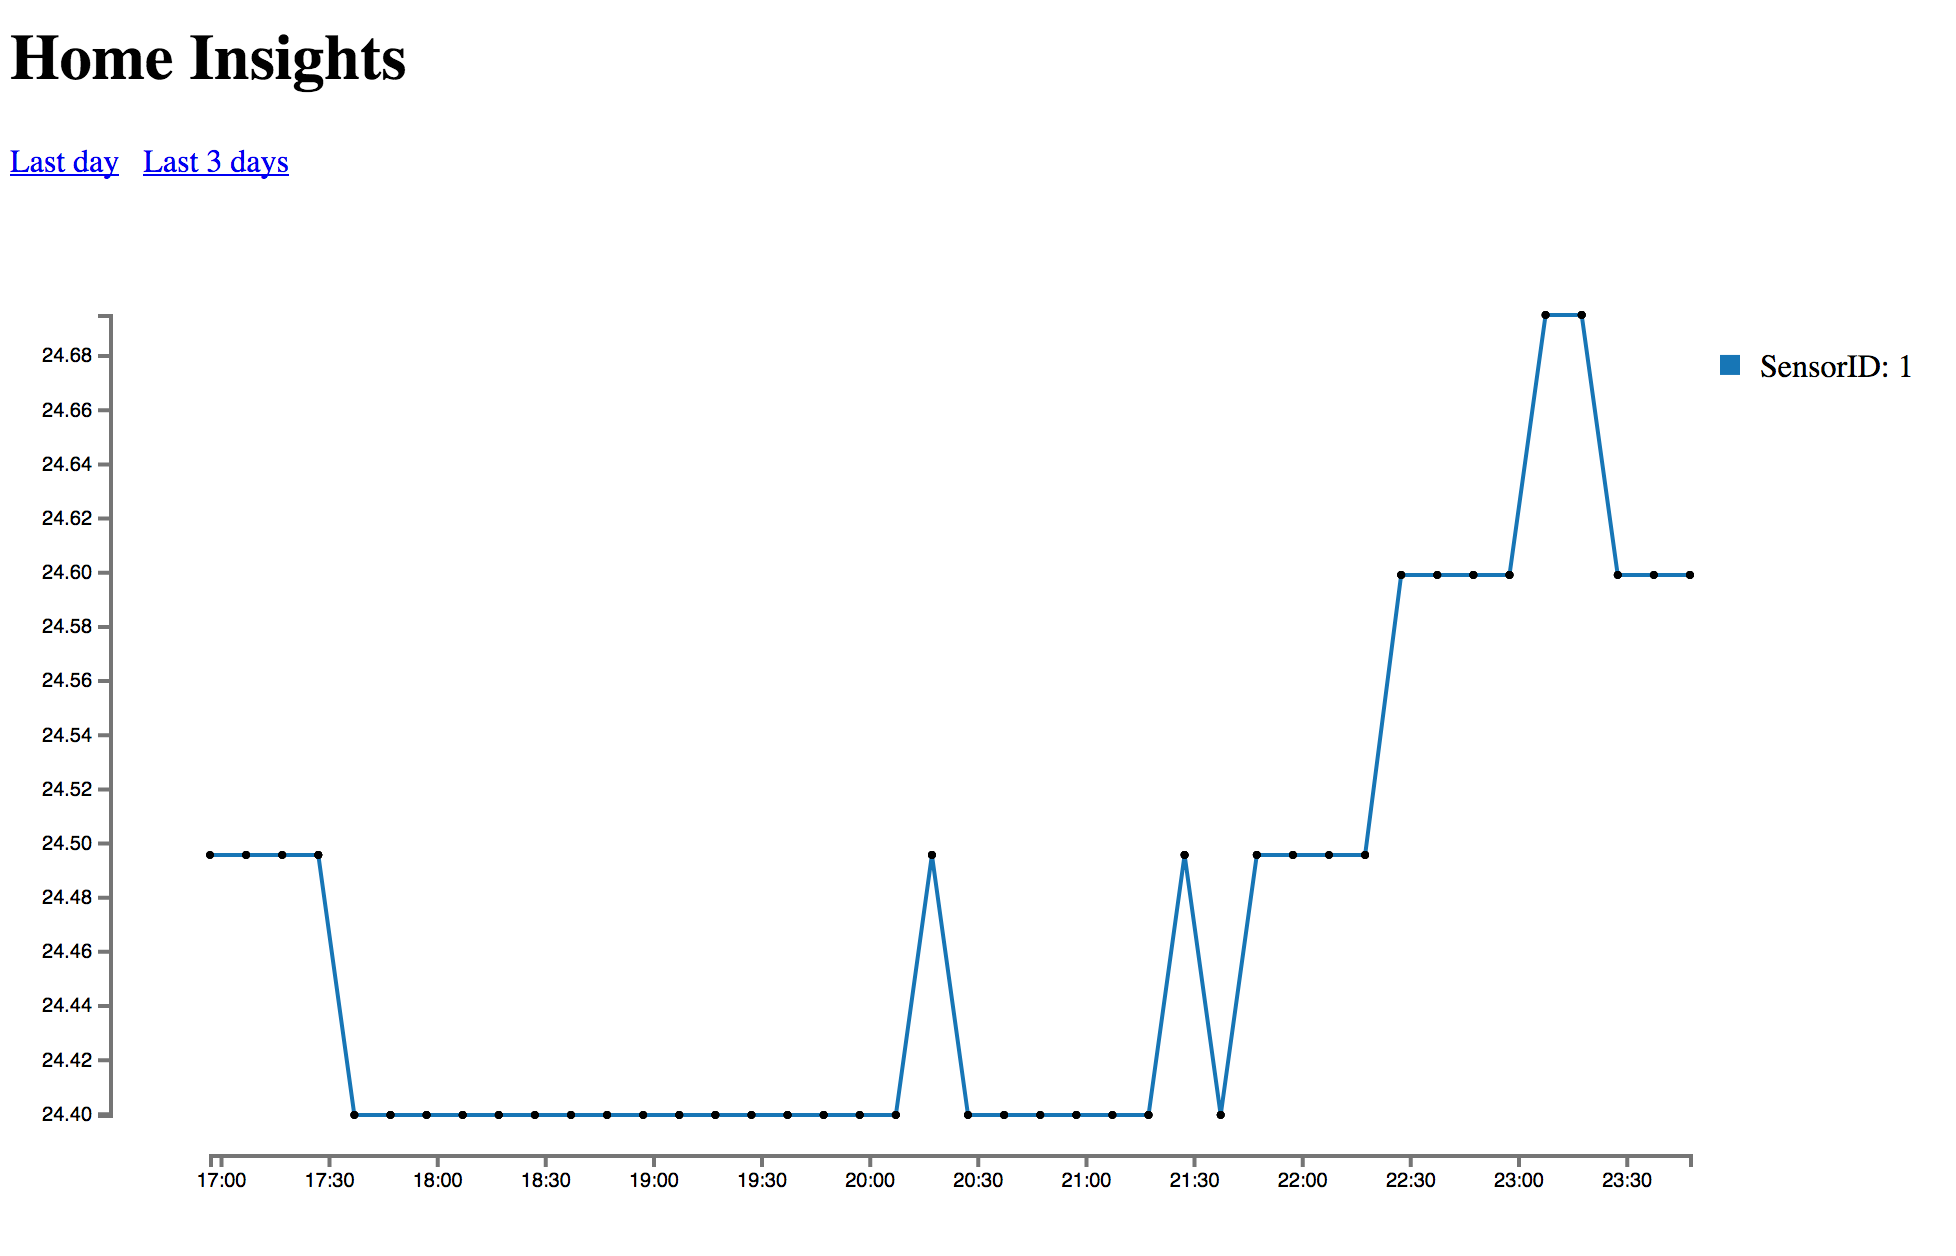 Screenshot of the website
“Production” prototype
Now, when everything was sort of working, the time has come to create a first “prototype”. In other words, replace huge and bulky Arduino UNO with Arduino Mini. The latter does not have convenient usb port to flush the firmware through so you need something more fancy. Luckily, if you have Arduino UNO everything you need to do is just to remove ATmega328P chip and you can flush Mini straight ahead if you will connect power, ground, TX, RX and Reset pins from UNO to Mini.
The other thing to consider is that if you have few prototypes, you will need to change SENSOR_ID in the firmware each time you flush in order to distinguish the sensors you put in different rooms/floors/etc.
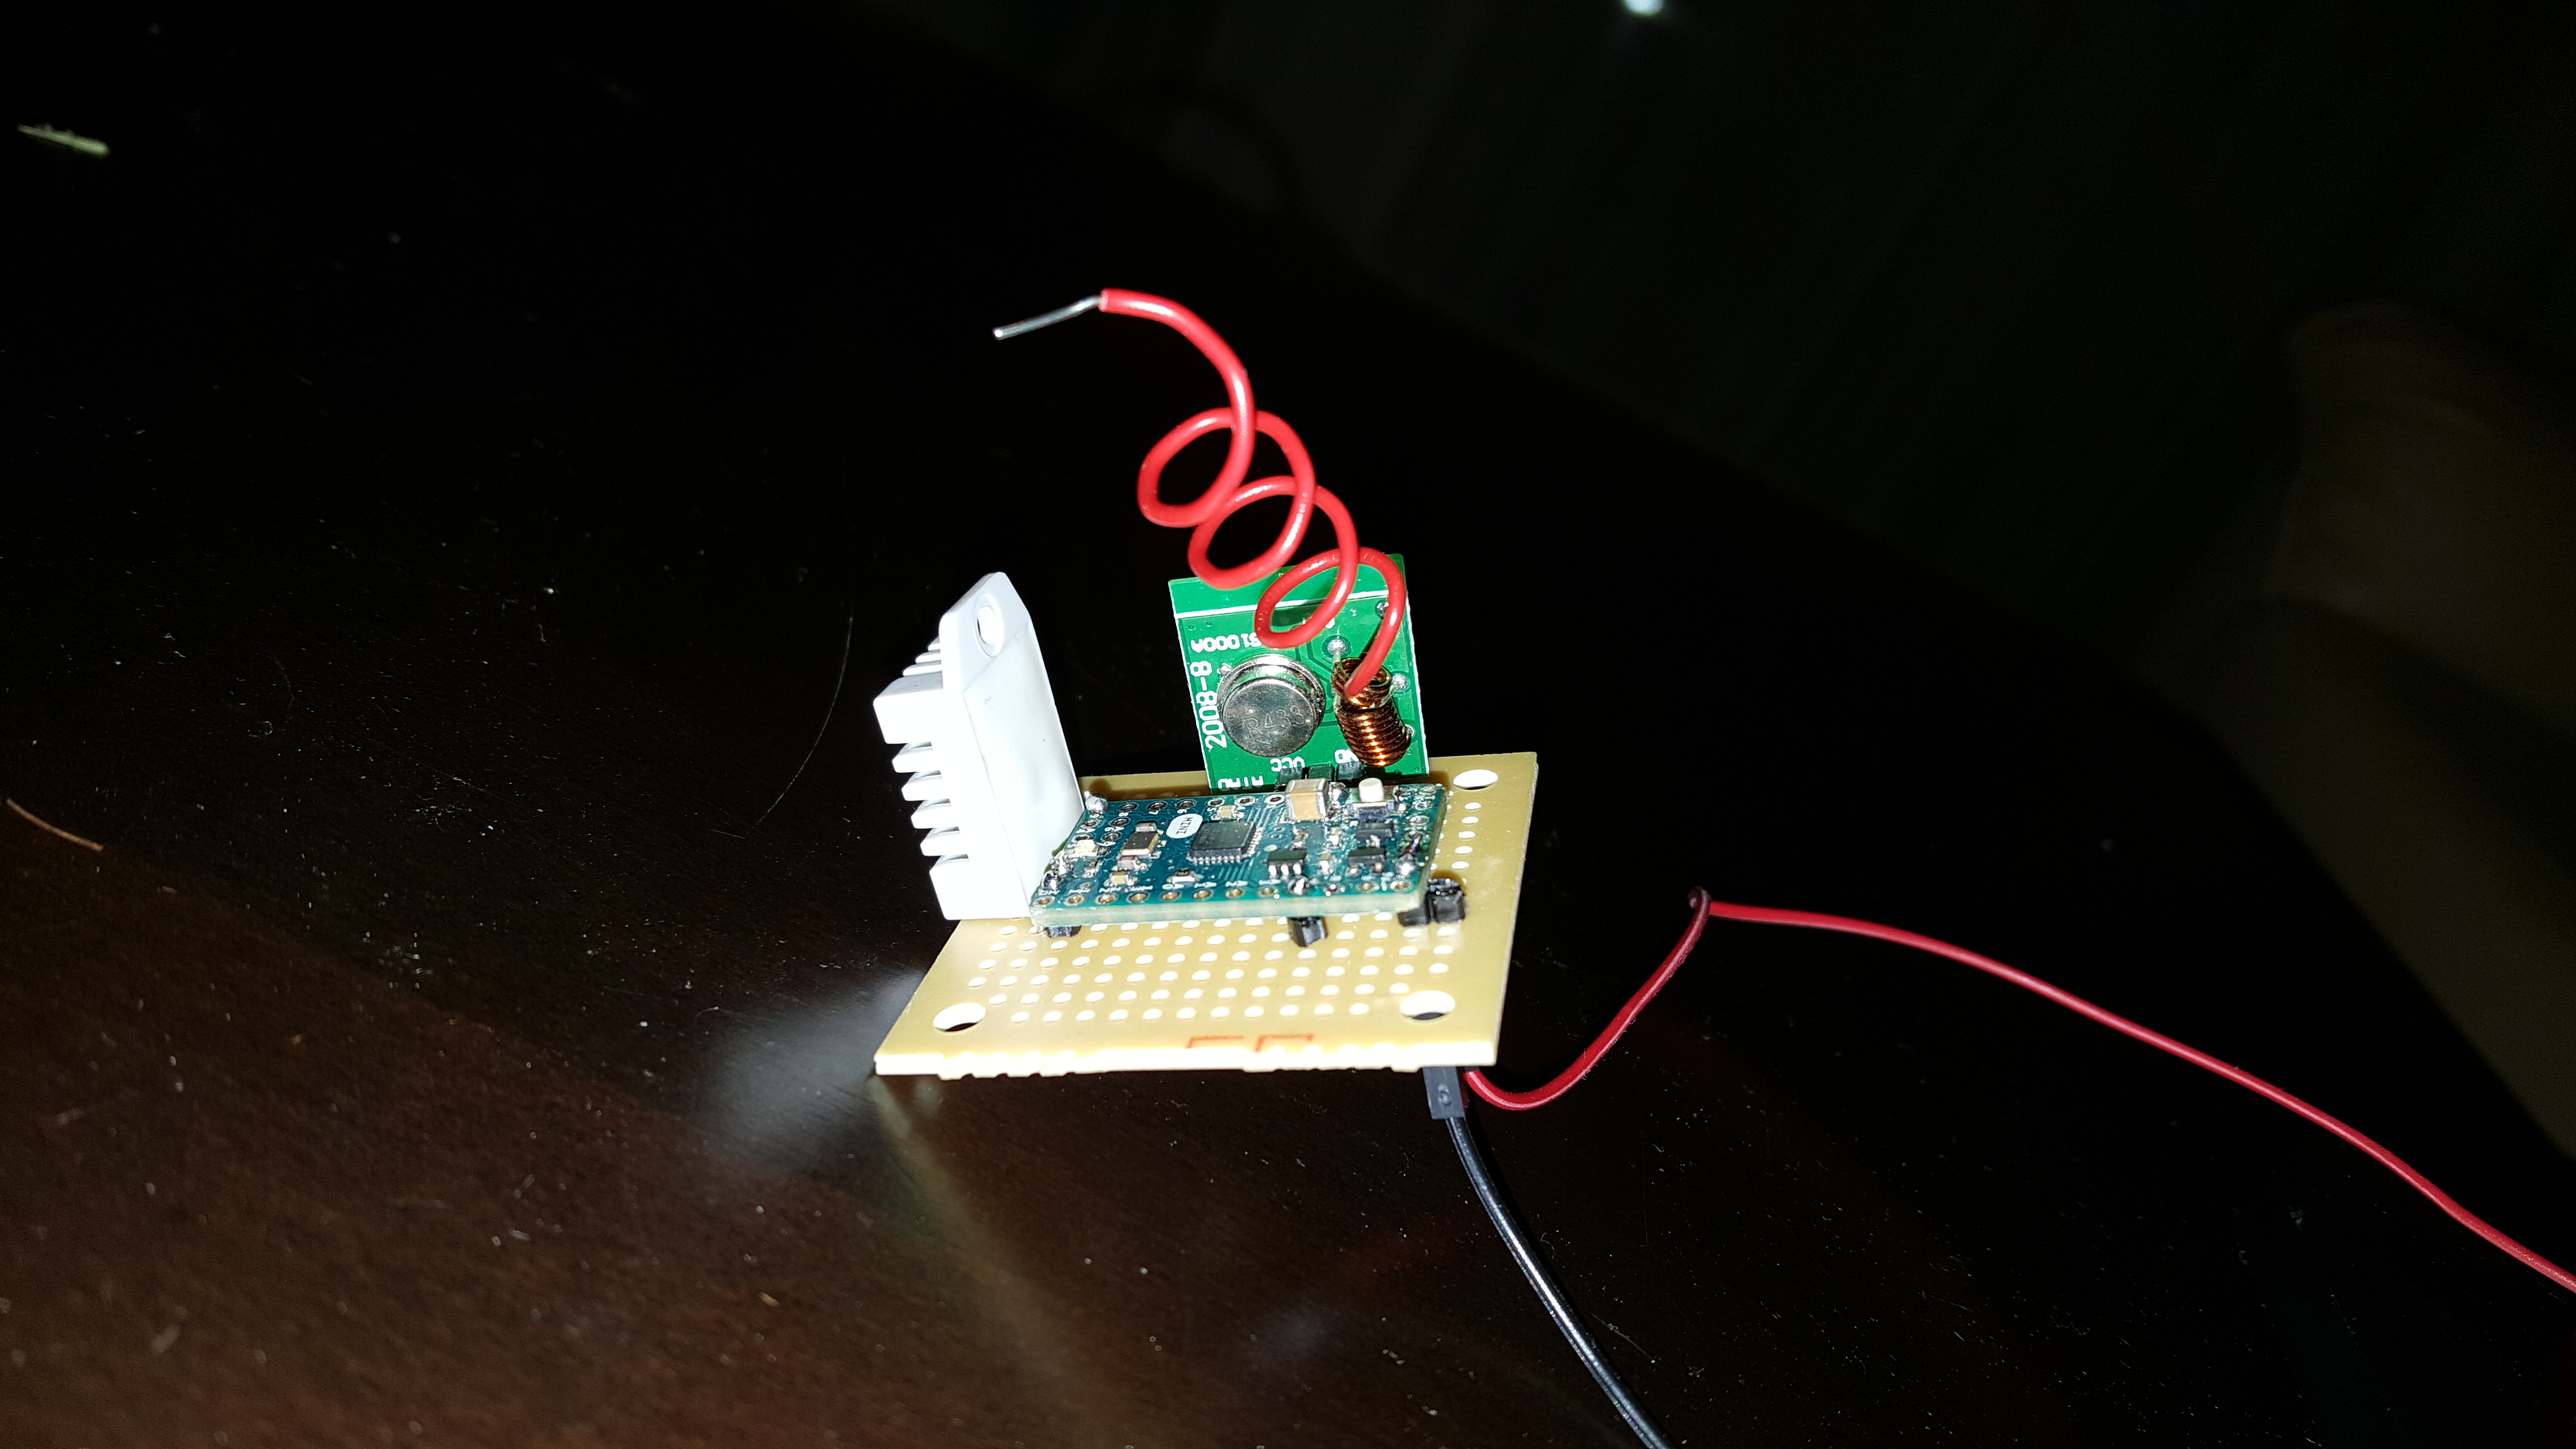 First prototype ready to be connected to the power source
The end
So this is how embedded programming stack of this project looks like: from IO Pins, volts and radio signals to backends, databases, servers and frontend which displays it. A little bit fuller than just full.
The system described is currently working in my home. It’s very interesting to observe the temperature trends at night or after opening a window (it’s winter right now). It was very interesting experience building it from scratch to a working prototype which is at least somehow useful.
All code is available in the repository at GitHub. You can find detailed instruction in the README. Feel free to make use of it or contribute. Code is in the temperature/ directory since I plan to add more applications of Arduino for my home.